

For space-restricted shortwave listeners (SWLs) and DXers, the struggle against the urban noise floor is real. If you do not have the acreage for a full-sized horizontal dipole or a sprawling longwire, you might think your long-distance monitoring days are limited. No worries, just use Arnie Coro Broomstick Antenna.
Enter the late, legendary Arnie Coro (CO2KK), the beloved host of Radio Havana Cuba’s DXers Unlimited. Arnie was a master of maximizing radio performance using everyday, low-cost materials. His crowning gift to apartment dwellers and portable operators was the Broomstick Antenna Special, a compact, helically wound vertical antenna that performs beautifully across the HF bands when space is at a premium. As a simple Dxer, I will walk you through the theory, the mechanics, and the step-by-step construction of this elegant, space-saving classic.
Why the Arnie Coro Broomstick Antenna Works
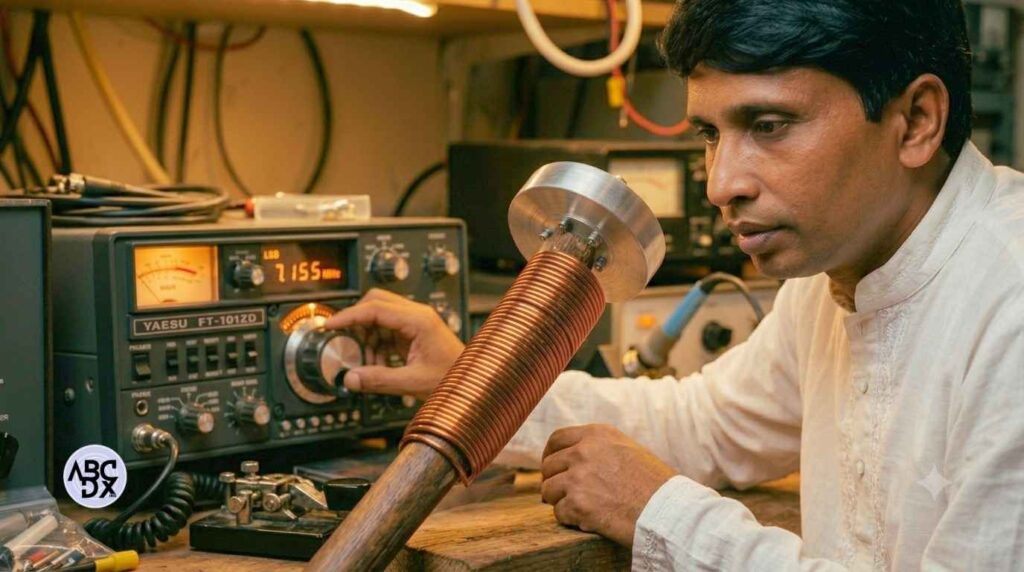
At its core, the Broomstick Antenna is a helically wound vertical monostructure. By wrapping a long piece of wire tightly around a narrow, non-conductive form, you physically compress a long electrical length into a tiny footprint. What sets Arnie's design apart from generic helical verticals is the inclusion of a capacitance hat at the top. This aluminum disc alters the current distribution along the element, increasing its electrical length while significantly reducing localized electrostatic noise pick-up—the exact kind of interference generated by modern household appliances.
Component Specifications

| Material Component | Ideal Specification | Acceptable Alternative |
| The Mast Form | 4 to 5 ft wooden broomstick or 3/4" (19mm) heavy-walled PVC | Bamboo or fiberglass rod |
| The Element Wire | AWG 16 PVC-insulated solid copper household wire | AWG 18 enamel-coated magnet wire or standard speaker wire |
| Capacitance Hat | 6 to 12-inch (15-30 cm) Aluminum Disc / Duct Cover | Thick aluminum pie pan or copper plate |
| Feedpoint Hardware | Stainless steel bolt, washers, and nuts | Large brass wood screws |
🛠 Step-by-Step Construction Guide
Building the Broomstick Antenna takes only a couple of hours. Follow these procedural steps precisely to guarantee structural integrity and peak RF performance.
1. Prepare the Mast Base: Prerequisite.
Secure the bottom of your broomstick or PVC pipe into a stable, vertical base. You can use a heavy umbrella stand, a block of wood with a tight-fitting borehole, or a weighted patio mount. The assembly must stand completely vertical on its own.
2. Mount the Capacitance Hat: Top Assembly.
Drill a hole directly through the center of your aluminum disc and the top end of the broomstick. Bolt the aluminum disc firmly to the top of the mast. Ensure the metal-to-metal connection points are clean.
3. Anchor and Connect the Wire: Top Connection.
Strip 1 inch of insulation from the starting end of your AWG 16 wire. Securely crimp or screw this bare end directly to the aluminum disc using a ring terminal or a dedicated grounding screw. This ensures your capacitance hat is electrically bonded to the radiating element.
4. Wind the Helical Coil: Winding Phase.
Begin wrapping the wire tightly around the broomstick, working your way down from the top disc. Keep the turns flush against one another—neat, uniform, and tight. Continue this continuous wind until you reach roughly 2 to 3 inches from the bottom of the mast.
5. Create the Feed point Termination: Bottom Assembly.
Drill a hole near the bottom of the mast and insert a long stainless steel bolt with washers and nuts. Wrap the remaining end of the coiled wire tightly around this bolt and secure it with a nut. This bolt serves as your high-quality feedpoint terminal.
6. Protect the Windings: Weatherproofing.
To prevent the wire from shifting over time, wrap a protective layer of heavy-duty PVC electrical tape tightly over the entire length of the coil, or apply several thin coats of clear outdoor spray enamel.

📡 Deploying and Tuning for Maximum DX
Crucial Expert Note: The Broomstick Antenna is a high-impedance system. While it can receive signals straight out of the box, it requires an antenna tuner and a proper RF ground return to truly come alive.
To maximize your signal-to-noise ratio (SNR) and bring in those weak, distant signals, deploy the antenna using these expert optimization techniques:
- The Lead-In Cable: Run a short length of wire (3 to 10 feet max) from the bottom feedpoint bolt directly to the antenna terminal of your tuner. Keep this lead-in link as brief as physically possible to avoid picking up localized indoor interference.
- The Counterpoise (Artificial Ground): Since this is an asymmetrical vertical layout, it needs a mirror for its RF currents. Connect a wire of at least 16 feet (5 meters) to the ground chassis of your antenna tuner or receiver. Let this wire trail out along the baseboards of your floor or across your balcony.
- Optimal Placement: Position the antenna as close to an outdoor-facing window as possible. Better yet, mount it temporarily out on a balcony or porch railing during operating hours.
⚙️ Performance Notes of Arnie Coro Broomstick Antenna
- Strengths:
- Easy to build in a few hours.
- Compact compared to long-wire antennas.
- Good for urban or space-limited setups.
- Limitations:
- Reception is weaker than with a full-size outdoor antenna.
- Best for shortwave listening (SWL), not transmitting.
- Aluminum disk top-loading has a limited effect; don’t expect miracles for DXing far regions like Africa from the U.S.
✅ Practical Tips
- Place the antenna near a window or outdoors for best results.
- Use a longer wire if you want better coverage of lower frequencies.
- Pair with a low-noise preamp if your receiver struggles with weak signals.
The Expert Verdict
Arnie Coro’s Broomstick Special proves that elegant engineering beats raw physical scale every time. By using standard hardware store parts and focusing on a tight helical wrap paired with a true noise-rejecting top hat, you get a compact HF antenna that punches far above its weight class. The Coro broomstick antenna is a clever, budget-friendly design for shortwave hobbyists. It’s not a powerhouse compared to large outdoor antennas, but it’s an excellent DIY project that balances simplicity, portability, and decent performance.